Category Archives: System Programming

An IDE Device Driver for Simplix

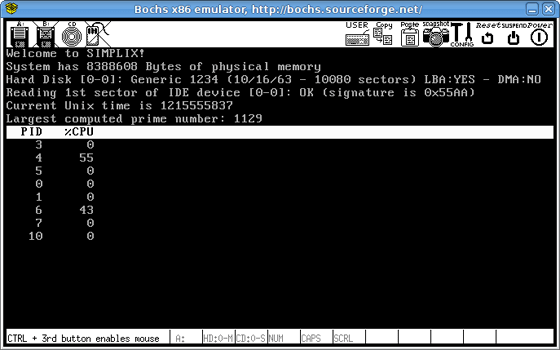
Over the past couple of weeks, I have been working on an IDE hard disk driver for my hobby operating system Simplix. This driver probes for existing IDE controllers, identifies the IDE devices connected to these controllers, and allows for reading/writing contiguous sectors from/to these devices. It communicates with IDE devices in PIO mode (no DMA) and does not support ATAPI devices (i.e. it does not offer any support for CD-ROM or DVD-ROM drives) At the same time, I also wrote a RAM disk driver, a simple block device interface, and a test program in the form of a kernel thread. This test program reads the first sector of the master IDE device connected to the primary IDE controller, and displays the last two bytes of this sector. These are usually 0x55aa (boot record signature)

Go ahead and take a look at the source code online. You can also download the Simplix distribution, compile it and run it either in Bochs/QEMU, or on a real PC. Below is a screen shot of Simplix running inside Bochs. Cheers!

Simplix Running on Real Hardware

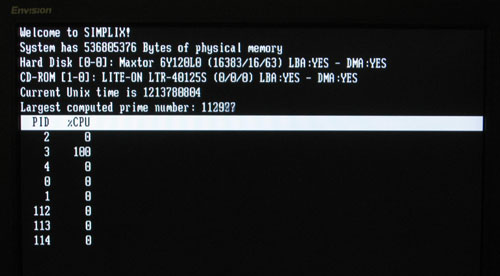
This morning, as I was just finishing up the code responsible for detecting IDE devices (hard disks, CD-ROM drives, etc.) in Simplix, I felt like trying my operating system on real hardware. I have a 4 year old PC with a floppy drive at home, so I decided to give it a shot. The result is pure geek pleasure. Cheers!

Screen shot of Simplix running on real hardware

New Version of Simplix, My Hobby Operating System

Some of you may remember this post about Simplix, my hobby operating system. The first version, published in Sept., was not able to do much and was really buggy. Over the next 9 months, as I was studying the inner workings of modern operating systems, I also wanted to experiment with some of the concepts and ideas I was learning. I decided to apply my newly acquired knowledge to a new version of Simplix I was secretly working on. This new version contains a lot of improvements:

  • Greatly improved the performance of the page allocator.
  • New high performance memory allocator (kmalloc/kfree)
  • Better handling of software exceptions: Kill the current process and display debug info.
  • New system calls. Simplix now supports exit, fork, waitpid, getpid, getppid, time, stime, sleep and brk.
  • New scheduling algorithm. This algorithm is ridiculously simple and not particularly efficient or elegant. It should however be fair to interactive jobs, while doing its best to accomodate CPU intensive tasks.
  • Implemented a small set of user space libraries, including string manipulations (string.h) and a trivial implementation of malloc and free copied directly from the book “The C Programming Language” by Brian W. Kernighan and Dennis M. Ritchie.
  • Much cleaner source tree, improved source code documentation, etc.

As you have probably noticed by now, this new version of Simplix still does not provide any I/O facility for user space tasks. I/O is probably the most complex part of an operating system, so I decided to put it off for a little while longer. In this version however, I decided to write a few sample programs:

  • A Unix time counter implemented as a kernel thread.
  • Another kernel thread that finds and prints prime numbers.
  • A user task that computes the first 10,000 decimals of the number PI.
  • A kernel thread that prints live information about the system.
  • A program that creates a lot of user space tasks, each of them sleeps for one second before exiting.

You can already take a look at the complete and up-to-date source code, and even download it. Compiling Simplix requires a not-too-ancient version of GCC, make, and a few basic command line tools available on almost all Unix systems (objcopy, dd, etc.) If you don’t feel like trying it out yourself, I put together a very short Flash video showing the system booting and running inside Bochs. You can also put the kernel binary on a floppy and try it on a real PC with a floppy drive. Cheers!

Note: If you can’t see the video below, it’s probably because you are reading this article using a news reader. If that’s the case, open this article in a web browser to view the video.

Get the Flash Player to see this content.

Software Development Services outsourcing | What is sleep number bed cost and price? | really adorable tool that can save youtube videos

Introducing Simplix, an Operating System Anybody Can Understand

Back in university, I took a few classes dealing with operating system design. These classes were extremely theoretical and, in some ways, helped me throughout my curriculum and my career, serving as a solid base I could then build upon to gain new knowledge. However, after spending a few years working with high level languages in sandboxed environments, you tend to forget how things work at the lower level, and that sometimes leads to less than optimal higher level code. As a consequence, a few months ago, I decided it was time for me to brush up on my core CS skills. However, I needed a tangible goal. And then I thought: why not write an operating system? OK, not a full blown operating system of course, but the seed of a very basic one (calling Simplix an operating system is a bit of a stretch since it cannot be used for anything actually useful) One that other people could look at and actually understand (Even MINIX, which was designed to be easy to understand by students, is not that easy to grasp without spending a lot of time hunched over the code) Here are the high level characteristics of Simplix:


  • Target architecture: PC with a single Intel 386 or better CPU
  • Monolithic, interruptible, non preemptible kernel
  • Hardware interrupt handling using the Intel 8259 PIC
  • Software interrupt handling
  • Basic management of physical memory
  • Peripherals: keyboard, video screen
  • Support for kernel threads and user space processes
  • Support for virtual memory using segmentation
  • Support for system calls

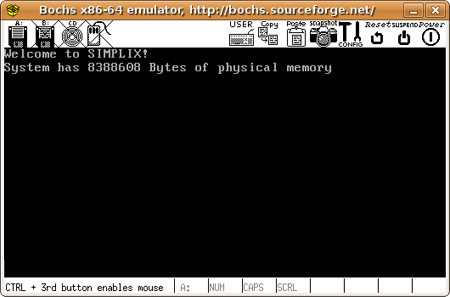
Here is a screenshot showing Simplix running inside the Bochs emulator:

Over the next few months, I will be posting several articles on this blog in an attempt to explain how Simplix works, so please stay tuned! In the meantime, you can already take a look at the complete up to date source code and even download it. Also, if you are interested in the topic of operating system development, I warmly recommend reading the bible of system programming: Operating Systems: Design and Implementation (Second Edition) by Andrew S. Tanenbaum and Albert S. Woodhull. I got mine used on Amazon for $8… Cheers!

How to make a Bochs disk image

In this article, I try to synthesize several (incomplete or inaccurate) articles I’ve found on the Internet to guide you through the process of creating a disk image you may use with the Bochs emulator. The steps described below are intended for a GNU/Linux system and some of them require super user privileges. Also, you need to have GRUB installed on your system.

1. Create a disk image. Here, I create a file named disk.img, containing 10080 blocks (each block being 512 bytes, this will create a file that’s about 5MB)

$ dd if=/dev/zero of=disk.img count=10080

2. Use FDISK to create a partition table on the image file:

$ fdisk disk.img
   x     -> Extra functionality
   c 10  -> 10 cylinders
   h 16  -> 16 heads
   s 63  -> 63 sectors per track
   r     -> Return to main menu
   n     -> Create a new partition
   p     -> Primary
   1     -> Partition #1
   1     -> First cylinder
   10    -> Last cylinder
   a     -> Set bootable flag
   1     -> Partition number
   w     -> Write partition to disk

Note that you have to tell fdisk about the geometry of your disk, and that geometry has to match the size of the disk you created in step 1 (10 cylinders * 16 heads * 63 sectors per track = 10080 blocks). For an introduction on disk geometry, cylinders, heads and sectors, read this Wikipedia article.

Let’s take a quick look at the Partition Table in the Master Boot Record (See this Wikipedia article for a description of the structure of the partition table)

$ hexdump disk.img

The 16 bytes at offset 446 (0x1BE) are:

0180 0001 0f83 093f 003f 0000 2721 0000

Keep in mind that these values are stored using little-endian convention (see this Wikipedia article to find out more about the meaning of endianness in computer science). Also see this article to find out how the CHS values are computed.

Offset Description
0×00 0×80 means that this partition is bootable
0×01 0×000101 is the CHS address of the first sector in the partition:
S = 0×01 = 1
H = 0×01 = 1
C = 0×00 = 0
0×04 0×83 is the type of the partition (Linux native here)
0×05 0x093f0f is the CHS address of the last sector in the partition:
S = 0x3F = 63
H = 0x0F = 15
C = 0×09 = 9
0×08 0x0000003f (63) is the logical block address of the first sector in the partition
0x0C 0×00002721 (10017 = 10080 - 63) is the size of the partition, in number of 512 byte blocks

3. Setup the loopback device. In order to do this, you need to calculate the offset (in bytes) of the first sector of your single partition. Use the following command:

$ fdisk -l -u disk.img
  Device Boot      Start         End      Blocks   Id  System
disk.img1   *          63       10079        5008+  83  Linux

This tells us that our single partition starts at the 63rd block. Hence our offset is 63 * 512 = 32256.

Finally, type:

$ losetup -o 32256 /dev/loop0 disk.img

4. Format the disk (EXT2FS)

$ mkfs.ext2 /dev/loop0

5. Mount the disk:

$ mount -o loop /dev/loop0 /mnt

6. Now, let’s install GRUB. Start by copying the necessary GRUB files:

$ mkdir -p /mnt/boot/grub
$ cp /boot/grub/stage1 /boot/grub/stage2 /mnt/boot/grub/
$ vi /mnt/boot/grub/grub.conf
   title=MyKernel
   root (hd0,0)
   kernel /mykernel

7. Unmount the device:

$ umount /mnt

8. Detach the loopback device:

$ losetup -d /dev/loop0

9. Finish up the GRUB installation:

$ grub --device-map=/dev/null
   device (hd0) disk.img
   geometry (hd0) 10 16 63
   root (hd0,0)
   setup (hd0)
   quit

10. Setup your .bochsrc file in the same directory as your disk image:

megs: 32
romimage: file=/usr/local/share/bochs/BIOS-bochs-latest, address=0xf0000
vgaromimage: file=/usr/local/share/bochs/VGABIOS-elpin-2.40
ata0-master: type=disk, path="disk.img", mode=flat, cylinders=10, heads=16, spt=63
cpu: count=1, ips=15000000
mouse: enabled=0
log: out.bochs
boot: disk

That’s it. Start Bochs and the GRUB interface should appear:

Bochs emulator showing GRUB